Add an ADO Database Data Source
-
When connecting to a remote ADO Database data source, the connection to the remote database is made from the App Server. By default, the App Server runs under the Local System Account which means that if you want to use Windows Authentication to log in to the remote database, it will be the System Account which is being authenticated. However, the System Account has no username/password with which to be authenticated and so you may need to configure your login in some other way.
For example, if the remote data source is a SQL database, and the SQL instance is running on a different server to that running the App Server, you can configure SQL to authenticate against the machine name of the server running the App Server instead.If the remote data source is a SQL database and you are running both App Server and SQL Server on the same machine you should note that from SQL Server 2012 onwards, the Local System Account is no longer automatically enabled as a login nor is it made a member of the sysadmin server role within SQL Server. Therefore, when running SQL Server and App Server on the same machine, if you want to connect to the SQL Server using Windows Authentication, you will need to manually configure your SQL Server to provide the required access permissions for the System Account or grant it the sysadmin server role.
To add an ADO database data source:
-
Choose New Data Source from the Project group of the Ribbon's Home tab. This will display a sub-menu of the different data source types. Choose ADO Database.
-
The New ADO Database Data Source dialog box will be displayed.
Enter a name for this Data Source in the Name field. This name is used to reference the Data Source within your Project.
-
If you know the correct connection string required to connect to the remote database, enter it in the Connection String field. Alternatively click on the browse button,
 , to display the Data Link Properties wizard:
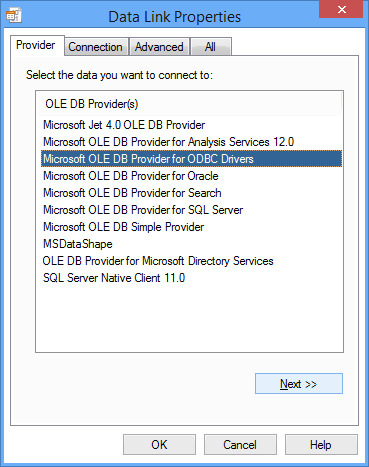
The database providers listed here may vary from that shown above, depending upon the database drivers installed on the machine.
Select the type of database you want to connect to on the Provider tab. Digitise Apps can connect to Microsoft SQL Server databases or any other database which can accept ANSI SQL queries.
By default, Digitise Apps connects to remote SQL Server databases using a Microsoft OLE DB client. If the database is hosted by an instance of SQL Server running on a machine which has the TLS 1.0 and 1.1 security protocols DISABLED, you will either need to update the OLE DB driver for SQL Server to the latest version, which supports TLS 1.2, or connect using a SQL Server Native Client driver instead. The choice is yours – contact your database administrator for advice.
If you don’t know whether TLS 1.0 and 1.1 have been disabled or not, try using the default Microsoft OLE DB client first (see below) and if you are able to connect to the database, the TLS protocols are enabled and you can continue to use this driver. If, on the other hand, at any point you get SSL Security errors or cannot connect to the Configuration Database, the TLS protocols may be disabled and you should try using the updated OLE DB driver or SQL Server Native Client driver instead.
If you decide to update the OLE DB driver, you will need to update it on any machine running an App Server which will want to connect to this remote database, which includes your development PCs. At the time of writing, you can download the update, Microsoft OLE DB Driver 18 for SQL Server, from Microsoft’s web site:
https://www.microsoft.com/en-us/download/details.aspx?id=56730
After downloading the installer, you simply run it and select to install the ODBC Driver Client Components.
If you decide to use the SQL Server Native Client instead, at the time of writing, you can download the latest version from Microsoft’s web site, if you need it:
https://www.microsoft.com/en-us/download/details.aspx?id=50402
Whichever driver you choose to use, if at any point during configuring the connection string you get an error message something like this:
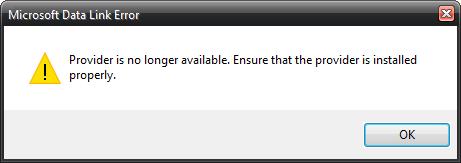
you will need to re-install the driver. You may need to uninstall the existing driver before reinstalling it.
To specify the connection string:
-
If the machine on which you are running the SQL Server has TLS 1.0 and TLS 1.1 security protocols enabled, under the Provider tab select Microsoft OLE DB Provider for SQL Server.
Where TLS 1.0 and 1.1 have been disabled, and you have upgraded the OLE DB driver, you should select Microsoft OLE DB Driver for SQL Server under the Provider tab.
Alternatively, where TLS 1.0 and 1.1 have been disabled and you want to use the SQL Server Native Client, you can select SQL Server Native Client 11.0 under the Provider tab and use this provider instead of the OLE DB Driver.
If you don’t know whether TLS 1.0 and 1.1 have been disabled or not, try using the Microsoft OLE DB Provider for SQL Server first and if you get SSL Security errors or cannot connect to the target database, either download the later OLE DB driver and reconfigure the connection string to use this driver or reconfigure the connection string to use the SQL Server Native Client 11.0 instead.
-
If your SQL Server is configured to use an availability group, for example, for backup/failover purposes, you should select Microsoft OLE DB Driver for SQL Server here. This will allow you to specify relevant initialisation properties under the All tab, if required.
-
-
Once you have selected a Provider, click
 or click on the Connection tab.
 -
The options available on the Connection tab, depend upon the driver you have selected under the Provider tab:
 Microsoft OLE DB Provider for SQL Server
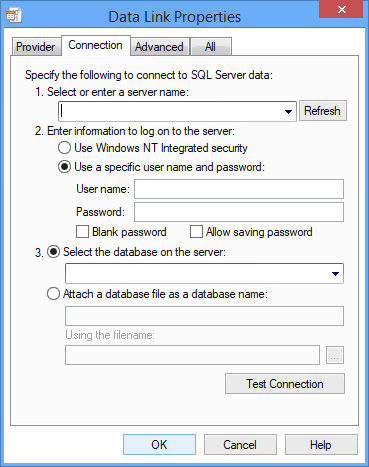
In 1. type in the name of the relevant SQL Server instance or select it from the drop-down list.
In 2. select the appropriate option depending upon whether you need to use Windows Authentication or SQL Authentication to log in to the target database. If you choose SQL Authentication (Use a specific user name and password), enter the required username and password and then make sure you select Allow saving password, otherwise you may not be able to connect to the database.
- If you are providing a specific username and password, rather than using Windows authentication, the username and password you enter here will usually be saved within the connection string in clear text and not in an encrypted format. However, this information is only stored on the App Server and isn't sent to or stored on any of your mobile devices.
In 3. enter the name of the target database or select it from the drop-down list.
You may need to check the Advanced and All tabs to see whether you need to configure any of the options here - ask your SQL administrator for guidance.
Clicking on
 will attempt to connect to your specified SQL Server instance and if the connection attempt is successful this means that you have specified a valid authorisation method and credentials. It doesn’t connect to the actual database nor verify that you have entered the correct database name. If the wizard is able to connect to your database server, a message confirming that the test was successful will appear. Otherwise, if you get an error message you will need to look back over the details you entered and edit them before you try again.
 Microsoft OLE DB Driver for SQL Server
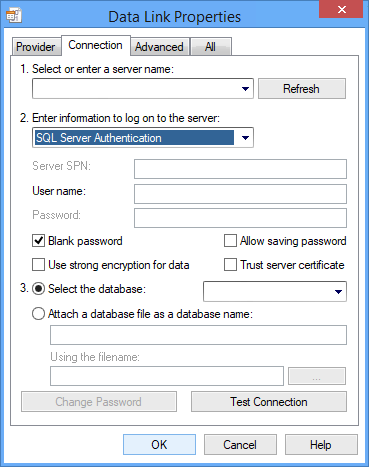
In 1. type in the name of the relevant SQL Server instance or select it from the drop-down list. If your SQL Server is configured to use an availability group, enter the Availability Group's DNS name here.
In 2. select the appropriate option depending upon whether you need to use Windows Authentication or SQL Authentication to log in to the target database.
If you choose Windows Authentication, you can enter a Server SPN, and select Use strong encryption for data and/or Trust server certificate if required. Your SQL Server administrator should be able to tell you which of these options you need.
If you choose SQL Server Authentication, enter the required username and password and then make sure you select Allow saving password, otherwise you may not be able to connect to the database. If Blank Password is selected, click on it to deselect it before you enter your password. Your SQL Server administrator should be able to tell you whether you need to select either or both of the Use strong encryption for data and Trust server certificate options.
In 3. make sure Select the database: is selected and then enter the name of the target database or select it from the drop-down list.
You may need to check the Advanced and All tabs to see whether you need to configure any of the options here - ask your SQL administrator for guidance.
Clicking on
 will attempt to connect to your specified SQL Server instance and if the connection attempt is successful this means that you have specified a valid authorisation method and credentials. It doesn’t connect to the actual database nor verify that you have entered the correct database name. If the wizard is able to connect to your database server, a message confirming that the test was successful will appear. Otherwise, if you get an error message you will need to look back over the details you entered and edit them before you try again.
 SQL Server Native Client 11.0
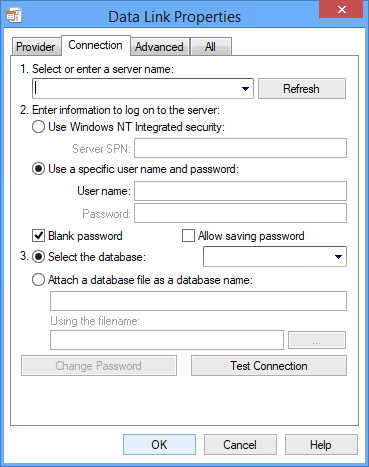
In 1. type in the name of the relevant SQL Server instance or select it from the drop-down list.
In 2. select the appropriate option depending upon whether you need to use Windows Authentication or SQL Authentication to log in to the target database.
If you choose Windows Authentication, enter the Server SPN if needed.
If you choose SQL Authentication (Use a specific user name and password), enter the required user name, deselect the Blank password option and then enter the password. Select Allow saving password.
In 3. select Select the database and then enter the name of the target database or select it from the drop-down list.
Next, click on the All tab and then find and double-click on the Persist Security Info option. Click on
 and then set the Property Value option to True. Click on the OK button and then click back on the Connection tab.
Clicking on
 will attempt to connect to your specified SQL Server instance and if the connection attempt is successful this means that you have specified a valid authorisation method and credentials. It doesn’t connect to the actual database nor verify that you have entered the correct database name. If the wizard is able to connect to your database server, a message confirming that the test was successful will appear. Otherwise, if you get an error message you will need to look back over the details you entered and edit them before you try again.
 Other Driver Selected
If you are connecting to a database other than a SQL Server database, the options available on the Connection tab will depend upon the driver selected under the Provider tab and the values you need to enter will depend upon the type of database you are connecting to, where it is located etc. Ask your database administration team for assistance if you don't know what to enter here.
Once you have successfully connected to the database server instance, click on the OK button to complete specifying the connection string.
-
-
You will return to the New ADO Database Data Source dialog box.
If your database includes views as well as tables and you want to use these to select data items to be mapped within your app, select Include Views as well as Tables.
The Enter Schema Tables Manually option allows you to manually enter which tables within the remote database contain the data items you want to use within your Digitise app. If you leave this option unchecked, Digitise Apps will display a list of all the tables in your specified database and allow you to choose the relevant ones for your app from the list.
Click on the OK button to continue.
-
If you didn't select Enter Schema Tables Manually in the New ADO Database Data Source dialog box, the Select Tables dialog box will be displayed.
On the right-hand side of this dialog box a list of all the tables in your specified database will be displayed. Select the tables which contain data you want to use within your app and use the << Add << button to move them into the left-hand list. The << Add All << button will add all the available tables into the left-hand list and the >> Remove >> and >> Remove All >> buttons can be used to deselect tables and return them to the right-hand Available Tables list. The Tables you select here will be displayed in the Data Source Schema diagram for this database which you will use later to indicate which data items you want to use within your app. Click on the OK button when you have selected all the required tables.
If you did select Enter Schema Tables Manually in the New ADO Database Data Source dialog box, the Select Tables dialog box will be displayed instead allowing you to type in the names of the required tables from the remote database.
Type the name of the first table in the Name field and then choose the << Add << button to add it to the Selected Tables list. Enter the names of any other tables you want to use from the remote database in the same way and then click on the OK button when you have finished.
- You can add or remove tables from the Data Source Schema after adding the Data Source by right-clicking on the Data Source in the Data Sources Pane and choosing Update Schema from the context menu displayed. This option will redisplay the Select Tables dialog box allowing you to change your selection of tables from the remote database. When you click OK, Update Schema will continue as described in the remaining steps below.
-
Your database will now appear in the Data Sources Pane – click on the Data Sources tab to display this pane if it isn't already in view.
A new window will also appear in the Workspace, showing a tree view of your database, looking something like this:
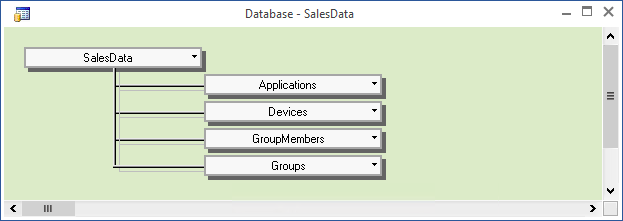
At the top of the tree, the 'Data Source node' is the name you gave this Data Source and branching off below this are sub-nodes representing the various tables you have selected within the database. Double-click on a table node to display the column fields within that table. Double-click on the caption bar at the top of the list to hide the fields again. Alternatively, you can toggle the display of the column fields by clicking on the Arrow symbol to the right of the table name or right-clicking on the table name and choosing Expand from the context menu.
-
You now need to tell your Project which column fields in the database you want to use. Each column name has a check box to the left of it. Select the check box for a column you want to include in your Project and the Data Mapping dialog box will appear:
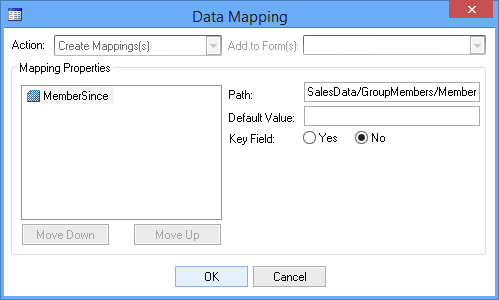
This dialog box allows you to specify a default value for this data item within your app and to specify whether this is a key field or not.
Click OK to add the data item or Cancel if you don't want to add it. If you choose OK the data item will be displayed in the Data Sources Pane below the name you assigned to this database. The data item trees displayed in the Data Sources Pane illustrate the database tables that will store the data on your mobile devices at runtime.
You can map multiple data items within an individual table in one go. To do this, select the items in the standard manner by holding down the Ctrl or Shift keys whilst clicking on the required items (don't click on the check boxes) and then choose the Data Mappings button in the Data Source group on the Ribbon's Home tab. Choose Map Selected from the menu and the Data Mapping dialog box will be displayed with all your selected data items listed:
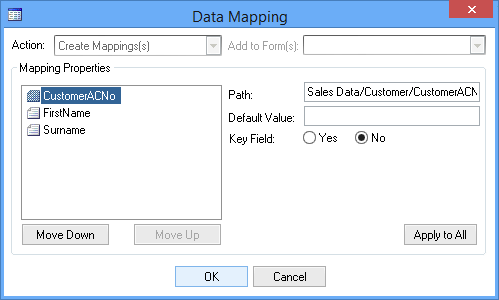
If you want to set default values or specify key fields, select a data item from the list and then edit the options for that item. If you want to apply the values specified in the selected item to all the other items listed in the dialog, click on the Apply to All button. You can also change the relative positions of the items using the Move Up and Move Down buttons.
The Data Mappings menu also allows you to delete the currently selected data items from your mapped list and to map or remove all data items in the current table. Alternatively, you can access these options by right-clicking on a table.
You don't have to map all the required data items at once. You can come back and add or delete mappings at any time. However, you won't be able to link a data item to a Control until you have mapped it as described above.
You can view and edit your data mappings by displaying the Data Sources Pane and double-clicking on the Data Source name, right-clicking on the name and choosing Open or, if displayed, clicking on the window or tab for the Data Source window in the Workspace.
Clicking on a node in the tree view in the Data Sources Pane, will display the Properties for that node in the Properties Pane. Editable Properties are displayed in black. Those which can't be edited are displayed in grey. The main Properties are:
Name
The name you have given to refer to this Data Source in your Project.
Connection String
ADO connection string with which to connect to the database.
Remember, if you are not using Windows authentication to log in to the remote database, the username and password will be stored in the connection string in plain, unencrypted text.
Include SQL Views
Specify whether you want SQL Views to be included in the database Schema as well as Tables.
SQL Type
If the remote database is a Microsoft SQL Server database set this Property to Transact SQL. For all other databases it must be set to ANSI SQL.
Username and Password
Use to allow App Server to impersonate a specific Windows user when using this database. Note the password is displayed here as asterisks.
For each Digitise app you publish to the App Server, there are a number of Properties relating to each Data Source which can be specified within App Manager. These Properties include the connection details and any username and password required to access the remote data source.
These Properties can be entered manually within App Manager or copied into App Manager, when the Project is published to the App Server, from the equivalent Properties specified within App Studio. Any values stored within App Manager will be used in preference to the values entered within App Studio. This allows you to modify some essential Properties for Data Sources without having to edit and republish your Project, e.g. to move temporarily from a live to a test data source. The Properties are specified within App Manager using the Data Sources button under the Properties tab for individual published apps.
The Overwrite Server Settings Property within App Studio allows you to specify whether you want the App Manager Data Source Properties to be overwritten by the equivalent values within a Project when you publish the Project to the App Server.
You specify a default value for this Property under the Project Properties but you can change this for each individual Data Source within the Project, if required.
Under the Project Properties, set this Property to True if you want the default action to be to overwrite the App Manager settings when you publish the Project or False if you want the default action to be not to overwrite them.
Under each individual Data Source, the default value for the Overwrite Server Settings Property is Default, which means it will use the value specified within the Project Properties. To use a different setting for an individual Data Source than the default setting, under the particular Data Source's Properties, change the Overwrite Server Settings Property's value from Default to True if you want the App Manager settings to be overwritten or False to retain the App Manager settings.
This Property defines the behaviour when uploading data from a mobile device to the Data Source's Target database using the Synchronise Scripting Method.
If set to True, any errors updating the remote database with data from the local table on the device, such as a failure to insert or update a record, will result in rolling back the local and remote tables to the state they were in before the transfer started, i.e. all changes will be reversed. If there are any errors, all the original modified records in the local table will remain marked as modified after the call to Synchronise completes.
If set to False, failures will be reported but the transfer will continue and records which are added or updated successfully will not be affected by failures elsewhere. Records which don't update or get created in the remote database will remain marked as modified in the local database on the device. This is the default setting.
This Property takes effect for both synchronous and asynchronous transfers but only affects uploading data to the remote database and not downloading data to the device.
Whatever the value of this Property, all errors will be reported back to the Digitise Apps Client and logged in the standard audit log. If set to True, the transfer does not immediately stop if a record fails to update or be inserted; rather, the transfer continues until all records have been attempted after which, if there have been any failures, all the changes are rolled back. This means that all potential issues are reported back to the Digitise Apps Client and not just the first one found. If a rollback is performed, an error will be generated for each record indicating whether the insert or update failed for that particular record or the record was rolled back.
For asynchronous transfers, after the transfer has finished, you can use Scripting Methods in the OnAsyncCompletion Event to check for and retrieve any errors, e.g. GetNumSyncErrors and GetLastDataError. Note that the OnAsyncCompletion Event may report a successful transfer even if records fail to be updated or inserted and you should always check for errors within your Script after the transfer has completed.
Last Identity SQL Command
This Property is only relevant when using the Synchronise Scripting Method to upload data from a mobile device to a remote Target Database and some or all of the Tables being updated contain Foreign Keys which take the form of Identity fields.
If a Database Data Source Table has a Primary Key, which is an Identity field, when a new record is created for that Table on the device, the Primary Key will automatically be assigned a unique identifier. If you have another Table which references the first Table's Primary Key within its data items as a Foreign Key, records in this second Table could contain the unique identifiers assigned to new records in the first Table.
When you update the back-end Target database with the records created on the device, the back-end database will replace the Primary Key Identities assigned on the device with its own Identities, since they must be unique within its own database. This means that any Foreign Keys containing Identities assigned on the mobile device will no longer match with the Identities in the corresponding Primary Keys.
The Synchronise Scripting Method allows you to update all relevant tables at the same time and by default it will order the sequence in which the tables are updated to allow it to record the new Identities and replace them in the appropriate Foreign Key fields as the remote database tables are updated.
In order to achieve this, after a new record is inserted into the remote database, the App Server will request the value assigned to the Primary Key and keep a record of the new value.
The Last Identity SQL Command Property provides the command required to be sent to the remote database to obtain the Primary Key of the last inserted record.
If the remote database is a Microsoft SQL Server database, or compatible, set this Property to Microsoft SQL Server.
If the remote database is a MySQL database set this Property to MySQL.
Alternatively, if the remote database is neither of these database types, you can type in the command required to obtain the Primary Key of the last inserted record, instead.
- The DISABLE_TABLE_SORT option, available in the SetApplicationOption Scripting Method, allows you to turn off automatic ordering of tables, so that you can process the tables in the order that you specify. In this situation, if you want Foreign Key fields to be updated correctly at the remote end in line with changes to the Primary Key values, you must specify the tables in a suitable order, with Primary Key tables first followed by tables containing Foreign Keys referring to those Primary Keys.
Device Database
Allows you to specify the local database on the mobile device in which you want your app to store data records for this table. Leave at Default if you want to use the default database to store this data.
Specify the name of the database file to use without the file extension. Note that for that Android, Apple and Windows Universal Platforms, you cannot include a path with the file name.
You can share a database between different apps by prefixing the database name with %SHARE%\, e.g. %SHARE%\MyAppData.
Device Table
Name of the table in the local database on the mobile device in which data records for this Data Source will be stored.
Timeout
Number of seconds the Digitise Apps Client will wait for data to start being downloaded when a data download is requested at runtime.
Storage Mode
Select Disk to retain data in the Digitise Apps Client's local database, Memory for temporary data. On Android, Apple and Windows Universal Platforms, data is always stored on 'disk'.
Filter
For ADO Database Data Sources, this Property allows you to specify a SQL Select statement 'where' clause to be used to specify the data you want to include when downloading data from the remote database. Enter everything which would come after the word 'where' here, you do not need to include the 'where' itself. You may want to specify the order in which records should be returned by including an ORDER BY clause, e.g. "user = 'John' ORDER BY table1.address1".
Columns can be referred to using the format <table>.<column> but <table>.* is not supported.
- You can change a SQL statement specified in the Filter/SQL Statement Property for a Data Source within App Manager. This allows you to change the records to be selected without having to edit and republish your app. To do this display the Properties for the relevant app in App Manager and then use the Data Sources button.
This Property allows you to specify that individual Data Sources should be re-uploaded immediately after being downloaded to the back office when using the SyncDataSource Scripting Method.
By default, this Property is set to False, which means that this Data Source Table won't be automatically re-uploaded after synchronizing.
If set to True, whenever this Data Source Table is synchronised using the SyncDataSource Method after the sync has finished, the table will then automatically be downloaded again to the device.
The download will be actioned by the Digitise Apps Client automatically calling LoadDataSource for any Data Source tables included in the synchronization which have this Property set to True. The current table will be deleted and a new one will be created in the device's local database.
If you want to download and then upload a Data Source, you may want to consider using the Synchronise Script Method instead.
This Property allows you to specify default Database Data Sources and Custom Tables to be transferred when using the Synchronise Scripting Method to transfer data between the mobile device and the back office.
If you do not explicitly specify the Data Sources to be transferred when calling Synchronise, the Method will check the value of this Property for all Database Data Sources and Custom Tables in order to determine which to include in the synchronisation.
The Property can take one of the following values:
None
This Data Source will not be synchronised.
Down
This Data Source will be included in the sync but data will only be downloaded from the back office to the mobile device.
Up
This Data Source will be included in the sync but data will only be uploaded to the back office from the mobile device.
Both
This Data Source will be included in the sync. Modified records will be uploaded to the back office and then the Data Source will be re-downloaded to the mobile device.
This is the default value for ADO Database Data Sources and the value that will be set in Database Data Source data items when upgrading existing Projects which were created using a version of Digitise Apps' predecessor MX prior to v10.
Client-Side Conflict Resolution
This Property is only relevant when using the Synchronise Scripting Method and determines how data downloaded to a device updates this local database table.
If this Property is set to Server, the local table will be deleted and replaced with the data being downloaded.
If this Property is set to Client, any records in the local table marked as modified will not be overwritten or updated with data from the server. All other records will be updated with the downloaded data including deleting any records from the local table which are no longer present in the downloaded data and creating new local records for new records in the download.
If this Data Source Table doesn't have a Primary Key, this Property is ignored and the local table will be deleted and replaced with the downloaded data.
Data Mapping Category
Mapping
The name of the column for this data item within the database to be held locally on the device.
Storage Category
Allows you to choose where large binary data items, such as photographs and videos, should be stored locally on a mobile device. It allows you to choose between storing these items in the local database tables or in files in the local file system, which provides faster performance at runtime. This option applies to items which are downloaded from a remote data source or created on the device within a Digitise app, e.g. when taking a photo or recording a video within an app. Videos must be stored in the local file system and not in the database.
This Property is available at the data item level, so you can choose where to store the contents of each column individually.
The Property has the following possible values:
Database
Data items will be stored in the local database. This is the default value.
File
Data items will be stored in files rather than in the local database.
To store items in files rather than the local database, your Database Data Source must still have a suitable data item, i.e. a data item with data type such as image or varbinary. You then need to set the data item's Mode Property to File. When you need to refer to this data item, e.g. within your Scripts or to create input and output mappings, you refer to the Data Source data item as normal and Digitise Apps keeps track of the file(s) used to store your photos or video(s), so you don't need to worry about file names or which item is stored in which file.
- When using the TakeVideo Scripting Method to record videos within an app, the Data field used to store the captured videos must be configured to store its data to file, otherwise an error message will be displayed when the user attempts to save their video.
The files are stored in the same location as the app's database so are sandboxed on Android and iOS devices but can be optionally encrypted for greater security if required (see below). You can also specify how the contents should be encrypted in transit when uploaded from the device (see below).
When you save data items to file rather than the local database, you must use the Synchronise Scripting Method to transfer data between the client and the remote data source, other data transfer Methods don't work with file data. The file contents are transferred, in both directions, as raw binary data.
- File storage is designed to be used with binary data, such as image and varbinary data types, for handling large data items such as images and videos or even pdf files. For smaller data items, such as text strings, numbers, dates etc., storing the data in the local database will be more efficient and quicker. If you attempt to store non-binary data in a file, the behaviour is undefined.
The rest of the Properties for this data item will vary, depending upon your choice here.
Transfer Encryption Mode - This Property is only displayed if you have selected File in the Mode Property above.
Determines whether the contents of the file will be encrypted before being uploaded to the remote data source. Possible values are:
Default
The data item will be uploaded to the remote database using the same encryption settings as all other data. The encryption is determined by the Server Properties in App Manager.
Passthrough
If the file is not encrypted (see under File Attributes Category below), it will be uploaded to the remote database using the same encryption settings as all other data – as specified in the Server Properties in App Manager.
If the file is encrypted, the file will be uploaded as it is and will be decrypted by the App Server. This uses a less secure encryption algorithm than using the Server Properties encryption (although it still uses an AES 256-bit encryption cipher) but may improve the speed of transfer.
Note that using the optional encryption will have an effect on performance at runtime as the files will need to be encrypted and decrypted.
Database Attributes Category
Primary Key - This Property is only displayed if you have selected Database in the Mode Property above.
Set this Property to True if this data item is the Primary Key or part of a combination of columns making up the Primary Key for this Data Source. The Primary Key must be a unique value for each record.
Otherwise it should be set to False.
Default - This Property is only displayed if you have selected Database in the Mode Property above.
Default value for this item.
Length - This Property is only displayed if you have selected Database in the Mode Property above.
Length of data, where applicable.
Allow Null - This Property is only displayed if you have selected Database in the Mode Property above.
If this data item can contain Null values, this Property should be set to True, otherwise it should be set to False.
The value of this Property should match the equivalent property for the relevant column in the remote Target data source otherwise you may get errors when uploading or downloading data to or from this data item.
Read-Only - This Property is only displayed if you have selected Database in the Mode Property above.
If set to True this data item cannot be overwritten in an existing record on the device. A value can be inserted when a new record is created. Primary Key fields, especially where the Identity property in the remote database is set to True, should usually be set to Read-only, otherwise the remote database might reject an attempt to update it.
By default, the Property is set to False, which means the data item can be overwritten, if required.
If you call the Synchronise or SyncDataSource Scripting Methods to synchronise data on the device with the remote database, data items which are set to read-only will not be included in the upload, with the exception of Primary and Foreign Key values, which are always included.
This Property, therefore, allows you to potentially reduce the amount of data sent up to the App Server during a sync by excluding data items which will never be modified by the user.
Ignore Invalid Control Characters - This Property is only displayed if you have selected Database in the Mode Property above.
If set to True, any unrecognised control characters will be ignored when displayed on your mobile devices.
SQL Type Override - This Property is only displayed if you have selected Database in the Mode Property above.
Allows you to specify the SQL data type to be used for this data item in the local database on the mobile device instead of the default data type assigned when the Data Source was created.
Auto - This Property is only displayed if you have selected Database in the Mode Property above.
Allows you to automatically generate unique values for a data column when a record is created using the CreateRecord Method. You can use this option to populate an Identity field or generate a unique GUID value.
The default value is None, which means this data item will not be automatically assigned a value when the record is created.
Select GUID to enter a unique GUID value, in the form:
00000000-0000-0000-0000-000000000000
Note that the data column must have a GUID or string data type.
Select Identity to enter a unique Identity value. Selecting Identity displays two further Properties:
Identity Seed
Provides the starting numeric value.
Identity Increment
Specifies the amount to increment or decrease the Seed or last used value to generate the number when a new record is created.
Note that GUID and Identity values are only guaranteed to be unique within the local database table.
Foreign Key - This Property is only displayed if you have selected Database in the Mode Property above.
Indicates whether this data item is a Foreign Key, i.e. its contents will match with a value in a Primary Key field in another table in the same remote database. This Property should be automatically set when you create the Data Source, providing the remote database has a Foreign Key constraint set appropriately.
The value of this Property specifies the table and data column containing the Primary Key to which this data item relates.
If the remote database doesn't have the column to which this data item is mapped set as a Foreign Key, you can manually enter the Digitise Apps Data Source Table and data item in the format: <table>.<dataitem>.
- Primary Key fields are automatically populated when a new record is created. Foreign Key fields, however, are not and you will need to manually populate the field(s) with appropriate values either within a Script or by using an output mapped Control.
SQL INSERT Override - This Property is only displayed if you have selected Database in the Mode Property above.
This option allows you to customise the SQL statement used to upload data to a remote ADO Data Source, when inserting new records in the remote database using the Synchronise Scripting Method.
If you enter something in this option, the value entered will be used, verbatim, to replace the standard field value for this data item in the SQL statement sent to the remote database to insert the records.
You could use this option to run a SQL function, set a constant value for a particular column, insert a Select sub-statement etc. For example, you could enter today's date in a DateAdded column by entering GETDATE() or automatically enter a unique value into an Oracle database by entering func.createnewvalue.
SQL UPDATE Override - This Property is only displayed if you have selected Database in the Mode Property above.
This option allows you to customise the SQL statement used to upload data to a remote ADO Data Source, when updating records in the remote database using the Synchronise Scripting Method.
If you enter something in this option, the value entered will be used, verbatim, to replace the standard field value for this data item in the SQL statement sent to the remote database to update the records.
You could use this option to run a SQL function, set a constant value for a particular column, insert a Select sub-statement etc. For example, you could enter today's date in a DateAdded column by entering GETDATE() or automatically enter a unique value into an Oracle database by entering func.createnewvalue.
SQL SELECT Override - This Property is only displayed if you have selected Database in the Mode Property above.
This option allows you to customise the SQL statement used to download data from a remote ADO Data Source to a device, when using the Synchronise Scripting Method.
If you enter something in this option, the value entered will be used, verbatim, to replace the standard field value for this data item in the SQL statement sent to the remote database to download records.
You could use this option to run a SQL function, specify a particular value for a column, insert a Select sub-statement etc. For example, you could use this option to only download records where the column mapped to this data item has the value 1, by entering 1 in this option.
File Attributes Category
Encrypt on device - This Property is only displayed if you have selected File in the Mode Property above.
Set this Property to True to encrypt the file using an AES 256-bit encryption cipher. This is the default setting. Set it to False if you don't need to encrypt the file.
- For ADO Database Data Sources you should have at least one Primary Key field specified, and this is essential if you want to update existing records in the remote database. You can specify multiple Primary Keys for an individual Data Source if necessary, in which case the combination of all Primary Keys must be unique for each record.
- If the remote database is not a Microsoft SQL Server database, once you have configured your Data Source as described above, you must then set the SQL Type Property to ANSI SQL before you can download data from the remote database.
- Once you have published an app you can change some of the above Properties, such as the Connection String, Username, Password and Timeout values, on the App Server using the App Manager utility allowing you to easily modify the connection details without having to edit your actual app. For example, you can use this feature to change between live and test data sources. You can also change these same values programmatically within your Scripts, allowing you to include connection options within an app.